Bergen Davis
Photography

HOW TO CAPTURE BETTER
PHOTOGRAPHS

Whether you are an upcoming photographer or a friendly instagramer, Pictures are an excellent tool to creatively express your ideas. Let's face it, Who doesn't love a stunning photograph? Photographs freeze time in moments of perfection and they speak a thousand words. How can you improve your picture-taking skills? Guess what! There isn't a magic camera out there that gets you an awesome photo. As Vin Diesel said it is not the car that wins the race, its the Driver.
One does not need to purchase a $2000 camera to get the Insta crazy photo you have been dreaming of. The tips that I will share with you shall utilize the gear you have now. get ready to pop out your Bangers, iPhones, Samsungs and DSLRs and get ready to capture your viewer's heart!
The 3 main tips are
Composition
Lighting
Pushing your camera to Its limit.
Composition

Composition is the technique that is used to organize the elements in your photograph. There are some fundamental rules that are to be followed when composing a photograph. Sorry for giving a lecture guys , You are here to find inspiration not boredom.
Now since that is out of the way .
The first technique is the Rule Of Thirds. Have u ever taken a photograph of a friend and find yourself placing them in the dead center of the frame, with the same old pose that they have used time and time again?
Yeah? Sounds familiar?
How boring is that? Look at the photograph above and compare it to the one with the young girl...
Both photos have a subject, both have a beautiful background, Only one photo used that background to give the photo a greater meaning.
Imagine breaking your photo into 6 parts following using the lines on the picture you see above, and placing your subject on three of the intersecting points and letting the rest of the point demonstrate
your background.
Did you do it?
Then that's it... That's the Rule of Thirds !! You have just given your photo more depth and insight
There are a couple of other techniques that you can check out that go more into advanced photography such as Leading Lines, Framing, Scale. However, those are context-specific and are dependent on what you would like to shoot
The photo at the top of the page taken in Casco Viejo, Panama, demonstrates leading Lines. Let me know in the comment sections if your interested and I can do a full article on those.

Lighting

The lighting of a photograph determines the quality, mood and overall impact of the photo. Lighting has been described as one of the three pillars of photography. So you can imagine how important it is that you get your lighting conditions right.
I will mainly focus on outdoor/indoor available light instead of artificial lights like studio lights etc.
Have you ever taken a photograph, the image is dark, underexposed, has an abundance of shadows harsh highlights and just doesn't illustrate what you had in your head? Those are the effects of bad lighting.
As start-up photographers, we have to capitalize on great lighting. There is no better time to do that than in the Golden Hour. Golden what? Yeah, that's right. Golden Hour speaking Golden Hour is 1 hour before sunrise and 1-hour sunset. It is the time when the light from the sun is soft and has a beautiful tone.

Understanding each hour can give you perspective when trying to achieve a optimal mood.
The warmer colours that are present before sunset sent give a more vibrant and warm tone and are perfect for silohoutes and displays of happy emotions.
The cooler tone colours that are present before sunrise are excellent for capturing landscapes .
The most appealing photographs that i have captured have been Golden Hour. So give it a try .
Pushing Your Camera
How many of us paid hundreds of dollars for our smart devices and still havent used the manual/pro mode ?
Guilty as charged ?
We spoke about the pillars of photography above in the lighting tips, they are ISO, Aperture and Shutter Speed. Manipulating these settings can give you a sharp and perfectly exposed photograph.
Play around with them within your camera pro mode and you will find that a whole new horizon opens up . How can you use them ?
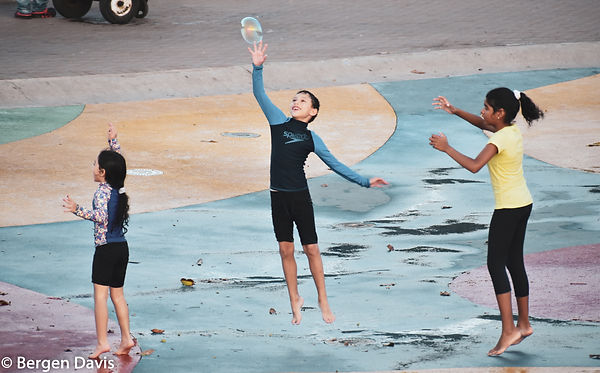
Well, you can increase your shutter speed to capture movement, Look the picture above the young boy is frozen in mid air. This was done through a fast shutter speed.(1/1000). However, what if you were shooting at night and using flash just wont do. ? That's a perfect time to reduce your cameras shutter speed. This will allow more light to hit your camera's sensor. To be creative and for a cool effect try and get some moving lights within your picture. Let me know what kind of pictures you end up getting . (Don't forget steady hands or a tripod for this one )
Another factor to consider is aperture .
The aperture of the lens you are shooting with, depends largely on the equipment you have , Generally lenses with large apertures are quite pricey, They control the amount of light entering the camera .
A large aperture allows you to have the really defined bokeh effect. How cool is that ?
The portrait mode found on Apple devices are a key feature that can be used to produce bokeh effects . This is a useful tool when trying to eliminate distraction from your main subject.

I hope you can use the tips above to increase the quality of your photographs, Despite the rules and principles of photography. The greatest factor that will boost the photos taken is the CREATIVITY of your vision, think outside the box. The world is your canvas , paint it with your imagination.
See you next time friends.
Remember to leave a comment below.